Project a mesh on a sphere
- Peter
- May 18
- 3 min read
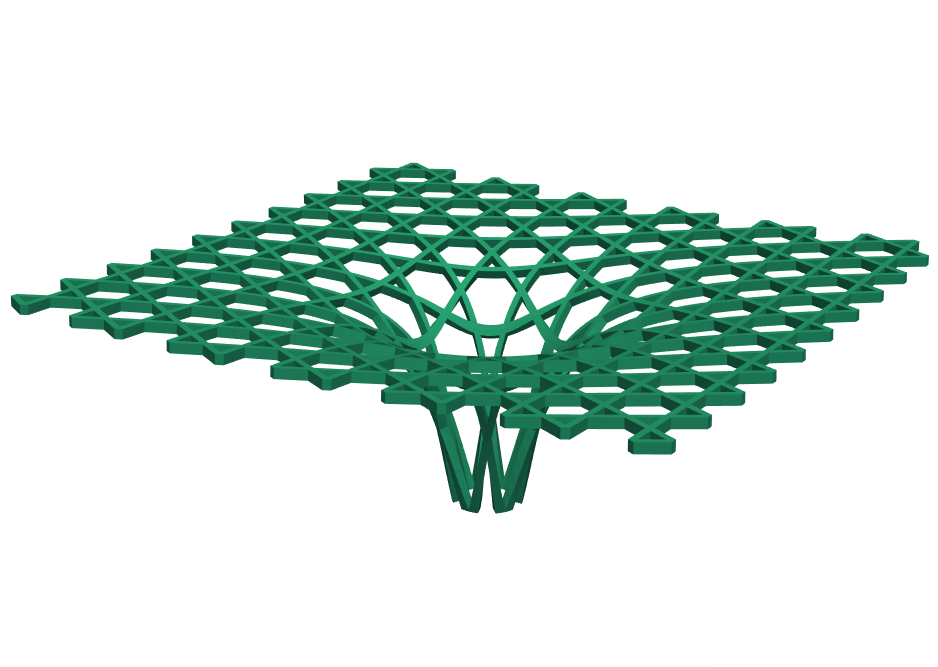
In this example, we construct a repeating 2D pattern and then project it onto the surface of a sphere. The process can be interpreted as the inverse of a shadow projection: if a light were placed at the center of the sphere, the original planar pattern would represent the "shadow" generated by the projected mesh.
This method makes it easy to turn simple 2D patterns into interesting and complex 3D shapes by projecting them onto a sphere. The result is a curved surface with a detailed pattern that can be used for many creative purposes. For example, it could be used to design 3D-printed lamps, decorative objects, or even parts of buildings.
Overview of the example:
Basic components: We start by creating basic components from quadrilateral elements.
Pattern generation: :The basic components are replicated along the X and Y directions to form a larger 2D mesh. The replication count and spacing are parametrized to control the scale and density of the pattern.
Spherical projection: The flat mesh is centrally projected onto the surface of a sphere using the projectOnSphere function. This method maps each point of the planar pattern radially from the center of the sphere onto its surface.
Creating thickness: The projected surface is converted to triangles, offset outward to create a second layer, and connected back to form volumetric prism elements — giving the projected surface mesh some physical thickness.
Mesh conversion: The boundary of the prism mesh is extracted and converted to triangles, making it suitable for exporting as stl model.
Light placement: A small sphere is visualized at the center of the projection sphere to represent a light source. This visually reinforces the interpretation of the flat pattern as a projection shadow.
from hellotriangle import shapes

# geometrical parameters
l = 1.0  # length of unit pattern
w = 0.3  # width
t = 0.15 # thickness
nr = 6   # number of replications
r = 2.5  # radius of the sphere for projection

# mesh parameters
nw = 3  # number of elements along width & length
nt = 1  # number of elements along thickness

# create basic components
quad = shapes.quad(eltype = 'quad4').subdivide(nw)
quad1 = quad.scale([w, w, 1.0])
quad2 = quad.scale([l, w, 1.0]).translate([w, 0.0, 0.0])
quad3 = quad2.rotate_Z(90.0).translate([w, 0.0, 0.0])

# create full pattern
quad1 = quad1.replicate(nr+1, dir = [1.0 ,0.0 , 0.0], step = l+w)
quad1 = quad1.replicate(nr+1, dir = [0.0 ,1.0 , 0.0], step = l+w)

quad2 = quad2.replicate(nr, dir = [1.0 ,0.0 , 0.0], step = l+w)
quad2 = quad2.replicate(nr+1, dir = [0.0 ,1.0 , 0.0], step = l+w)

quad3 = quad3.replicate(nr+1, dir = [1.0 ,0.0 , 0.0], step = l+w)
quad3 = quad3.replicate(nr, dir = [0.0 ,1.0 , 0.0], step = l+w)

flat = (quad1 + quad2 + quad3).convert('tri3')

# project on sphere
projected = flat.projectOnSphere(radius=r, center=(nr/2.0*(l+w), nr/2.0*(l+w), r))

# give thickness by offsetting
outer = projected.offset(distance=t)
prism = projected.connect(outer, div=nt)

# convert to a triangle mesh
tri = prism.getBorderMesh().convert('tri3')

# create small sphere at center of large sphere (= light)
light = shapes.sphere()
light = light.scale(0.1).translate([nr/2.0*(l+w), nr/2.0*(l+w), r])

# draw
draw(tri, color = "#D62246")
draw(light, color = "yellow")
draw(flat, color = "black")